Funny Sayings for Rice Krispy Treats
Jump to Recipe
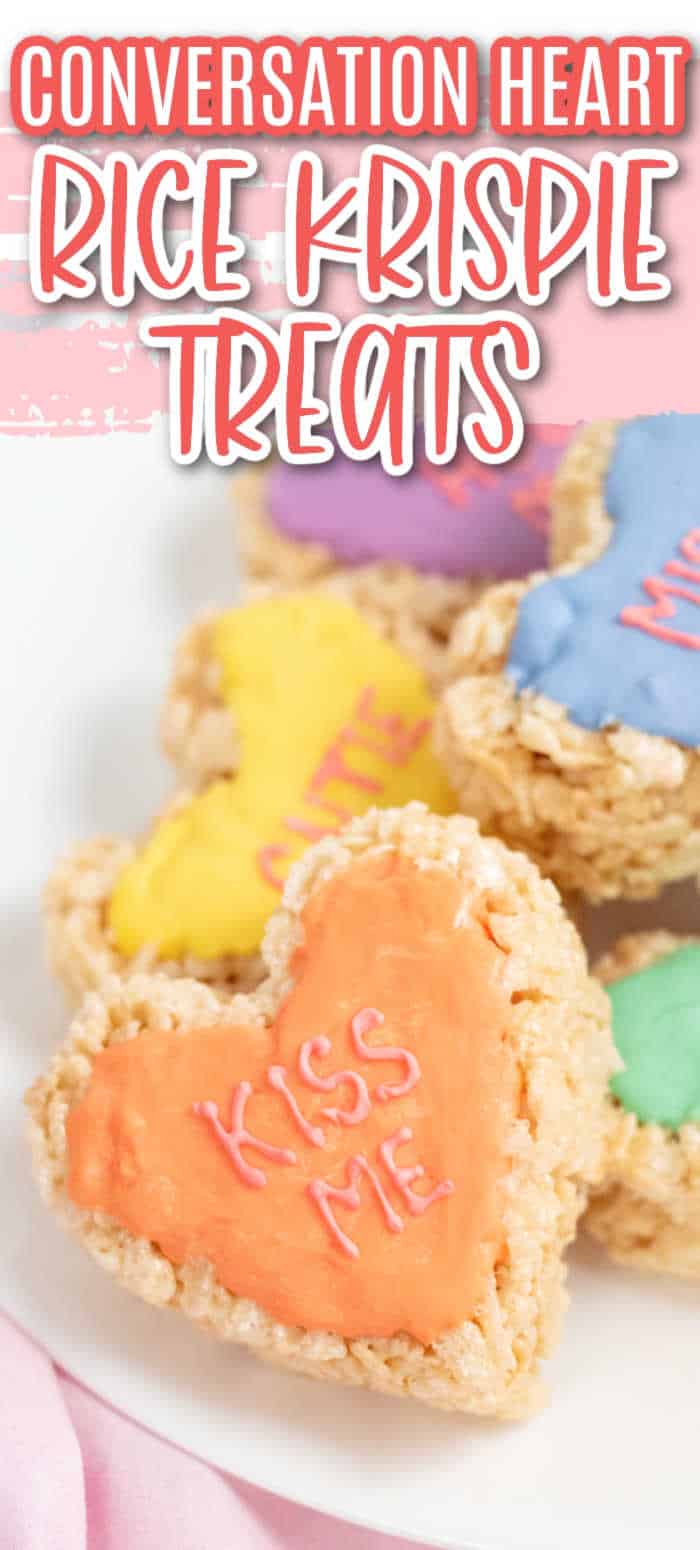
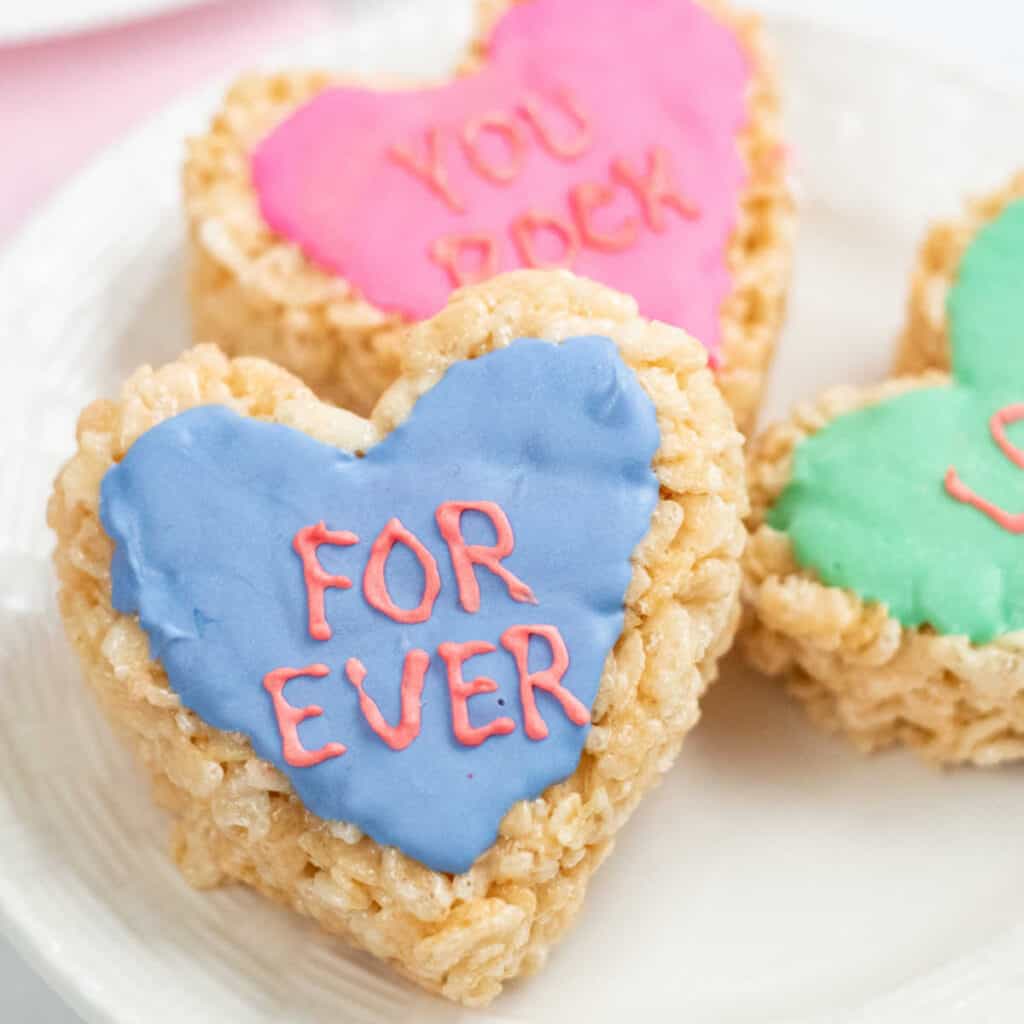
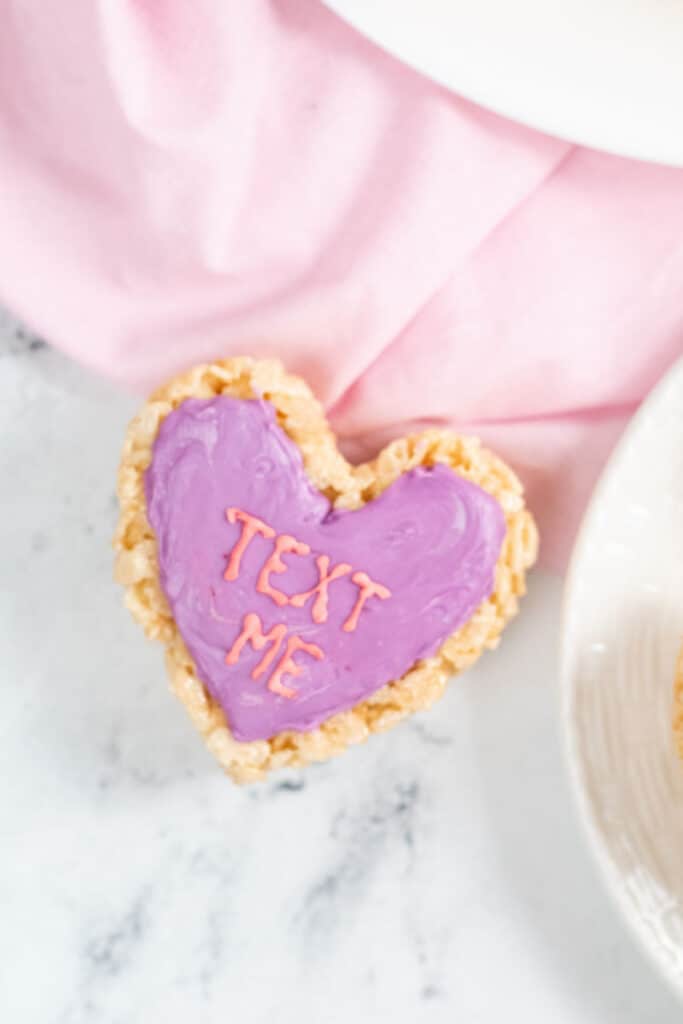
Looking for a fun and festive treat for a Valentine's Day party? These conversation heart rice krispie treats are a classic treat made over into a fun Valentine's treat!
Rice krispie treats have always been one of my favorites! Since I was a little girl I've loved everything about them!
Because of my love for them I love to make them over for every and any occasion! Since Valentine's Day is a great time for making and sharing sweets I thought they would be amazing dressed up as another Valentine's favorite, conversation hearts!
These Valentine's Day rice krispie treats are easy to make and are perfect for classroom parties, wrapping up individually and giving to friends, or enjoying as a special family treat!
You can make these fun treats say anything you'd like! Need some inspiration? This article about the history of candy conversation hearts has the classic sayings and lists of many of the more recently added ones!
- Other Posts You'll Love –
- Valentine's Day Cookie Bars
- Valentine's Hot Cocoa Bombs

How to make these treats heart shaped-
Making heart shaped rice krispie treats may seem tricky but it is actually quite easy! There are 2 ways you can go about it, both will require a heart shaped cookie cutter.
You can use any size cookie cutter you'd like. I used one that is about 2 1/2 inches across at it's widest point. The size of your cookie cutter will determine how many treats you end up with.
The first option for making these is to make rice krispie treats the old fashioned way and press them into a 13×9 baking pan. Line the pan with parchment paper and butter the parchment. Press the cereal and marshmallow mixture into the prepared pan and allow it to cool completely.
Once the rice krispie treats are cool lift them out of the pan and place on a flat surface. Use your cookie cutter to cut heart shaped out of the cooled treats. Try to stay as close to the edge as possible and keep the hearts as close together as possible to minimize scraps.
The pro of this technique is that it is pretty quick and easy once the cereal treats have cooled. The con is that you end up with scrap pieces so you'll have less treats.
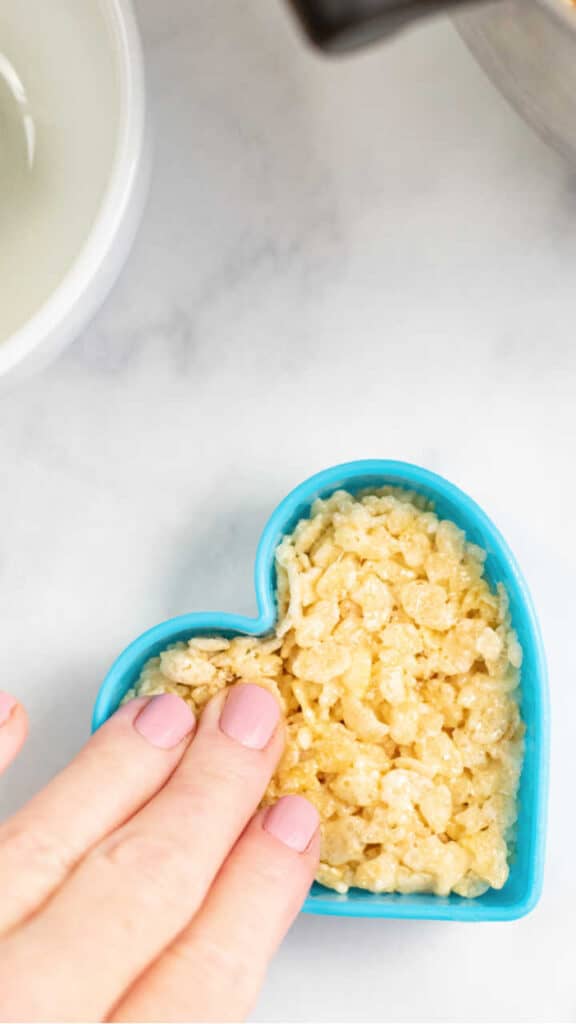
The second option is the one I prefer for a couple of reasons. First is because every bit of the cereal mixture gets made into heart shaped treats without scraps left over. Second you have control over how thick each treat is so you can make them as thin or thick as you'd like. It is also easier to make a variety of sizes if you'd like!
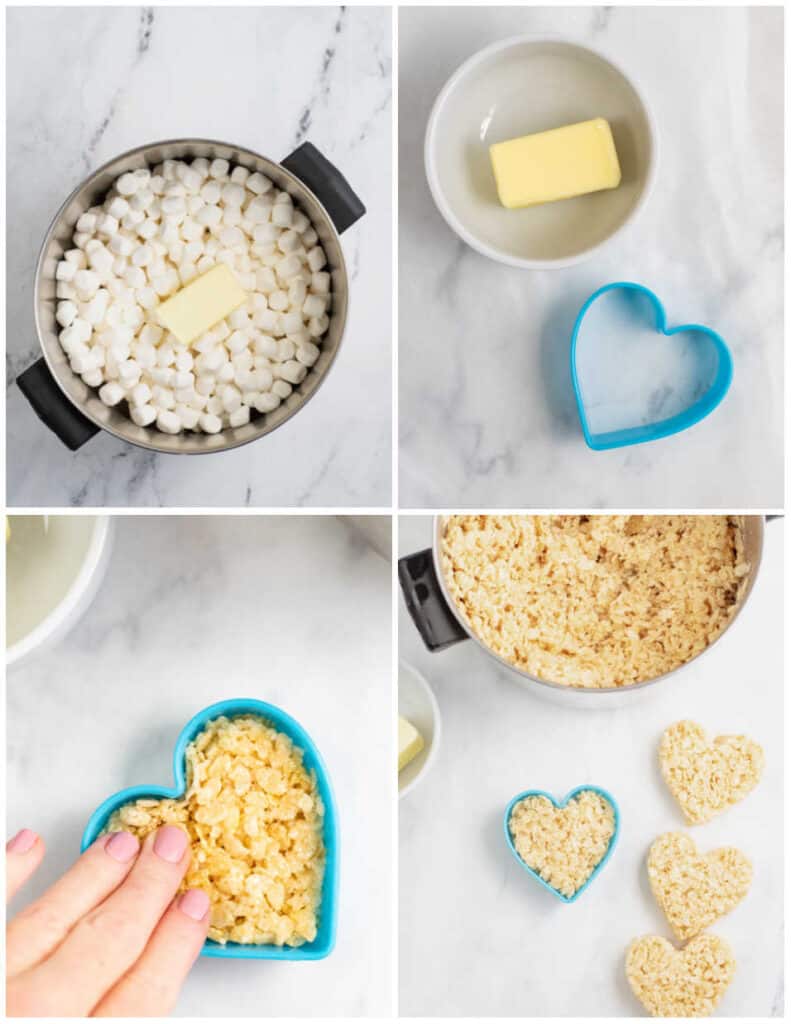
To do it this way you'll want to lay out a piece of parchment or wax paper to work on. You'll need your cookie cutter and a couple of tablespoons of butter in a shallow dish.
Butter the inside of the cookie cutter and the palms of your hands and fingers. While the cereal and marshmallow mixture is still warm (but cooled enough to handle) scoop out a handful and press it firmly into the cookie cutter. Repeat until all of the cereal mixture is shaped into hearts.
Allow them to cool completely before decorating.
Tips for working with colored candy melts-
I chose candy melts for decorating these treats because they come in so many fun colors, they are fairly easy to work with and they create a tasty crunchy chocolatey layer on top of the the treats.
They can be a little bit tricky to work with if you've never used them before so here are a few tips for working with them in this recipe.
Make sure they are fresh– Candy melts tend to be much smoother and creamier if they are fresh. Older packages that have been opened for awhile can end up lumpy.
Do NOT add water– It can be tempting to thin out your candy melts with water to make them smoother, however that is NOT what you want to do! The best way to make them smoother and more liquid is to add shortening like Crisco. You can also use coconut oil if that is what you have on hand.
Use a piping bag– When decorating these the easiest way to do it is with a disposable plastic piping bag. I like to use these. You can allow the melted chocolates to cool a little and then fill the piping bag. Snip off the end and you'll be able to control easily where the melted chocolate goes.
Melting the candy melts– There are a few ways that you can go about melting your chocolates when you are ready to use them. The first is the microwave. Place them in a microwave safe bowl and heat them in 20 second increments stirring between each until they are smooth. If necessary add in shortening 1/2 tsp at a time until the desired consistency is achieved. You can also use a double boiler or place a heat safe bowl over a small pan of water. Heat the water over medium heat and place the candy melts in the bowl. Heat the candy stirring frequently until they are smooth and melted. If necessary to thin or smooth the candy melts add shortening 1/2 tsp at a time. For this recipe, since it uses multiple colors, I like using the microwave so that each color can go in it's own bowl.
Mixing colors- For this recipe I wanted pastel colors which means mixing the colored candy melts with white candy melts. If you want to lighten a color that is already light like pink or yellow you'll want to use 1/2 cup of the colored candy and add 3 or 4 white melts. You can add more after they've melted if you want it to be even lighter. If you're starting with a dark color like blue or green and you want to create a pastel start with 1/2 cup white and add in 3-4 colored candies. Add in more for more intense color.
Coloring white candies– If you prefer to start with white candy melts and add coloring you absolutely can! The important thing is that you use the correct food coloring. You can't use liquid food coloring, you need coloring designed for chocolate that is oil based. You can find it online or in most baking or craft stores.
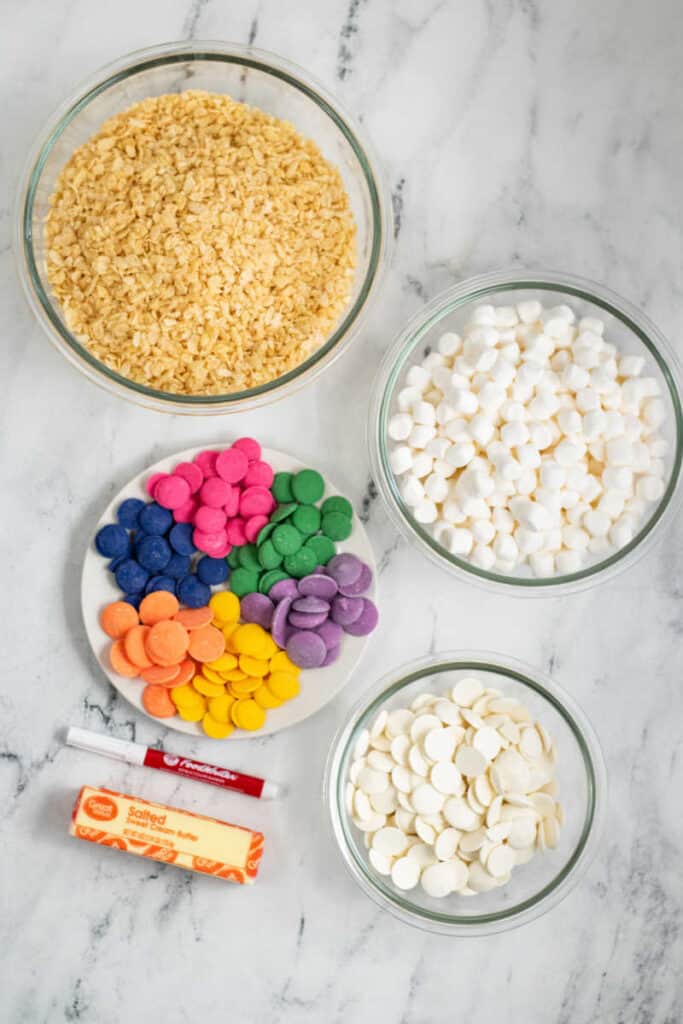
Here's what you'll need to make these Conversation Heart Rice Krispie Treats
1 – 10oz. Bag Mini Marshmallows
6 Cups Rice Krispies Cereal
1/2 Stick (4 Tbsp.) Butter
1/2 Cup Each Colored Candy Melts – Pink, Orange, Yellow, Purple, Green etc.
1/2 Cup White Candy Melts
1-2 Tbsp Shortening
1-2 Tbsp. Butter
Edible Markers
Disposable Piping Bags
Heart Shaped Cookie Cutter
Here's how to make these treats –
Place 4 tablespoons of butter in a large pot over medium/low heat, add in marshmallows. Heat, stirring frequently until the butter and marshmallows are melted and smooth.
Remove the marshmallow mixture from the heat and add in the crispy rice cereal. Stir gently folding the cereal into the melted marshmallows until they are evenly distributed and coated.
Cover a flat work space with wax paper or parchment paper. Place 1-2 tablespoons of butter in a shallow dish. Grease the inside of your cookie cutter and the palms of your hands and fingers with the butter.
Grab a handful of the rice krispie mixture and evenly press it into the cookie cutter. Gently lift the cookie cutter leaving a heart shaped rice krispie treat.
Repeat with the rest of the mixture until all of it has been turned into hearts.
(for alternate directions see the notes above)
Allow the treats to cool completely.

When you're ready to decorate your treats it is time to melt the chocolates.
(Make sure to see the tips above for best results!)
Place one color of chocolate melts in a microwave safe bowl.
Microwave in 20 second increments, stirring between each, until the candy is melted and smooth.
To create a smoother, more liquid consistency you can add 1/2 tsp shortening at a time until the desired consistency is reached.
You want them to be smooth and lump free but not runny.
Once they are melted allow scoop them into a plastic piping bag and snip off the end to create a small hole. To make filling the piping bag easier place it in a tall glass and fold it open over the sides (like putting a bag in a trash can) and then spoon your melted chocolate into it.
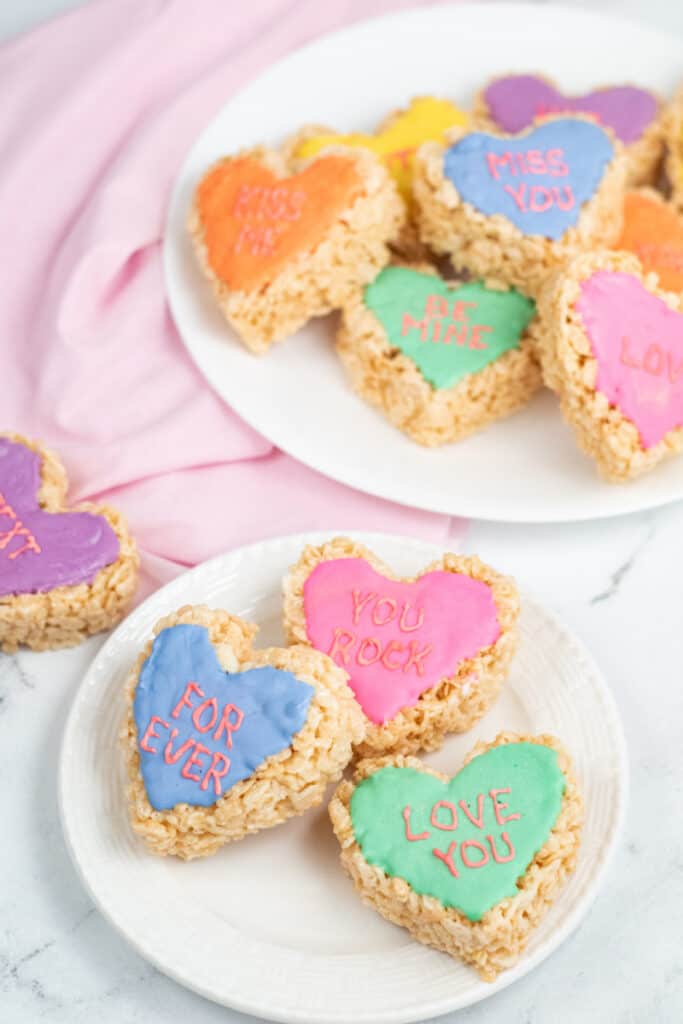
Pipe around the edges of your treat to make a heart outline. Then fill it in by piping the melted candy and then smoothing it with a knife or spoon.
Gently tap the treat on your work surface to help level out the chocolate and eliminate any bubbles.
Set aside and allow to cool.
Repeat with additional treats until all of them are decorated.
If you are using more than one color work with one color at a time using separate piping bags for each color.
Once you've finished all your treats and they are all cooled it is time to write sayings on them. (See the article I linked above for inspirations!)
I used pink candy melts for my lettering but you can use any color you'd like.
Melt the candy melts the same way as you did the other ones and place them in a piping bag.
If you're feeling confident you can pipe your words directly on the treats.
Alternately you can use an edible marker and write out your message and pipe over it. (Made a mistake? You can wipe the edible marker off of the chocolate coating with a wet paper towel)
Pipe on your lettering and set aside to cool.
Once all you treats are decorated and cooled they are ready to eat!
Store in an airtight container.
Ingredients
- 1 – 10oz. Bag Mini Marshmallows
- 6 Cups Rice Krispies Cereal
- 1/2 Stick (4 Tbsp.) Butter
- 1/2 Cup Each Colored Candy Melts – Pink, Orange, Yellow, Purple, Green etc.
- 1/2 Cup White Candy Melts
- 1-2 Tbsp Shortening
- 1-2 Tbsp. Butter
- Edible Markers
- Disposable Piping Bags
- Heart Shaped Cookie Cutter
Instructions
- Place 4 tablespoons of butter in a large pot over medium/low heat, add in marshmallows. Heat, stirring frequently until the butter and marshmallows are melted and smooth.
- Remove the marshmallow mixture from the heat and add in the crispy rice cereal. Stir gently folding the cereal into the melted marshmallows until they are evenly distributed and coated.
- Cover a flat work space with wax paper or parchment paper. Place 1-2 tablespoons of butter in a shallow dish. Grease the inside of your cookie cutter and the palms of your hands and fingers with the butter.
- Grab a handful of the rice krispie mixture and evenly press it into the cookie cutter. Gently lift the cookie cutter leaving a heart shaped rice krispie treat.
- Repeat with the rest of the mixture until all of it has been turned into hearts.
- Allow the treats to cool completely.
- When you're ready to decorate your treats it is time to melt the chocolates. Place one color of chocolate melts in a microwave safe bowl.
- Microwave in 20 second increments, stirring between each, until the candy is melted and smooth.
- To create a smoother, more liquid consistency you can add 1/2 tsp shortening at a time until the desired consistency is reached.
- You want them to be smooth and lump free but not runny.
- Once they are melted allow scoop them into a plastic piping bag and snip off the end to create a small hole. To make filling the piping bag easier place it in a tall glass and fold it open over the sides (like putting a bag in a trash can) and then spoon your melted chocolate into it.
- Pipe around the edges of your treat to make a heart outline. Then fill it in by piping the melted candy and then smoothing it with a knife or spoon.
- Gently tap the treat on your work surface to help level out the chocolate and eliminate any bubbles.
- Set aside and allow to cool.
- Repeat with additional treats until all of them are decorated.
- If you are using more than one color work with one color at a time using separate piping bags for each color.
- Once you've finished all your treats and they are all cooled it is time to write sayings on them. .
- Melt pink (or desired color) candy melts the same way as you did the other ones and place them in a piping bag.
- If you're feeling confident you can pipe your words directly on the treats. Alternately you can use an edible marker and write out your message and pipe over it. (Made a mistake? You can wipe the edible marker off of the chocolate coating with a wet paper towel)
- Pipe on your lettering and set aside to cool.
- Once all you treats are decorated and cooled they are ready to eat!
- Store in an airtight container.
Nutrition Information:
Yield: 12 Serving Size: 1
Amount Per Serving: Calories: 244 Total Fat: 4g Saturated Fat: 2g Trans Fat: 0g Unsaturated Fat: 2g Cholesterol: 6mg Sodium: 114mg Carbohydrates: 51g Fiber: 0g Sugar: 28g Protein: 1g
suttonthaniorefore.blogspot.com
Source: https://werefarfromnormal.com/conversation-heart-rice-krispie-treats
0 Response to "Funny Sayings for Rice Krispy Treats"
Post a Comment